Average Moss Removal Costs & Quotes
Last Updated on By Jon
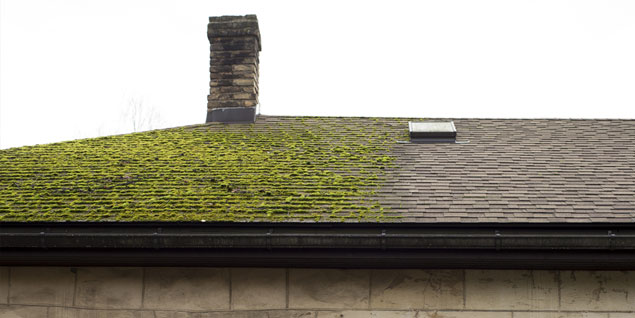
If your roof is covered in unsightly moss, our cleaning guide will provide you with further information, average prices and free quotes from local moss removal companies in your area.
Roof Moss Removal Costs
Want to know some average prices? Take a look below:
| Technique | Average Price | |
|---|---|---|
| Pressure washing | Small | £11.00 |
| Hand-removal and treatment | Medium | £8.00 |
Average price by roof size
| Technique | Roof Size | Average Price |
|---|---|---|
| Pressure washing | Small | £775.00 |
| Hand-removal and treatment | Small | £435.00 |
| Pressure washing | Medium | £895.00 |
| Hand-removal and treatment | Medium | £500.00 |
| Pressure washing | Large | £1,000.00 |
| Hand-removal and treatment | Large | £550.00 |
(Prices taken from multiple sources and averaged) Prices Checked 13/07/2025 |
||
Moss Removal Cost Calculator
Price of roof moss removal and cleaning
The price of removing moss from roofing is typically charged per square metre. For a normal roof, it may cost £11.00m2 to £8.00m2. Applying a coating will add additional protection for your roof and you can be charged approximately £25 - £30. The prices may vary depending on the materials used to build the roof and the tools used during this process, including any scaffolding. You get these cleaning services from professional roof cleaning companies online, where you can compare free quotes from each company. Thus, you can compare prices quickly and choose the one that suits your needs.
What are the benefits of removing moss from your roof?
- Removing moss from the roof increases the resale value of the house. A house that is well maintained, including the roof, will attract more buyers than one that has a lot of moss growth.
- Cleaning will reduce the possibility of a leaky roof because moss causes hair cracks and fissures, increasing the chances of a leaky roof.
- Prevents the cracking of roof tiles. When there is a lot of moss growing on a roof, the tiles and slates can become porous, allowing water to infiltrate into the materials, which later crack due to low temperatures.
Can moss cause damage to a roof?
Large amounts of moss on a roof over a more extended period is likely to cause roof damage. However, the extent of damage moss causes on the roof depends on the type of roofing material used. Some roofs are more resistant however much the growth is, while other roofs are vulnerable to the growth of mosses and even a tiny amount of growth can cause damage.
So which roofing materials are prone to moss damage?
- Cement - Cement tiles are also prone to damage; this occurs when the tile is weak or dusty. To prolong the roof's life span and prevent decay, you must clean any growth on cement roofing regularly.
- Clay - Clay tiles are easily damaged by moss growth; moss growing on its surface causes retention of moisture. The condition gets worse during the winter as freezing occurs, thus leading to expansion. To minimize the damages caused by moss growth, roofers design these roof types in a steep-like fashion to allow rapid drainage of all the rainwater.
- Guttering - Moss growth also affects guttering and downpipes. The blockage of drainage pipes is due to a lot of moss from the roof being washed down. When the moss comes down in large amounts, the gutters can bend down or even break. In the drain pipes, the moss blocks the pipes; thus, water can’t pass, leading to the freezing and expanding of this water, later bursting the pipes.
- Brickwork - Other materials that are vulnerable to damage by moss growth include brickwork chimneys and cement caps. When water freezes during the winter months, moisture can enter into cracks, providing suitable conditions for moss growth.
Available roof moss treatments
- There are products that you can spray onto your roof direct with no need to wash off. Before putting these chemicals in the spray bottles, you need to read and understand the instructions to get a good ratio of these chemicals before embarking on your spraying mission. If you mess with the balance of the chemicals, it could lead to corrosion of your roof. Remember, these chemicals are highly concentrated.
- You can opt to save your little cash by opting for homemade moss killer, where you can experiment on various substances. These killers tend to be less toxic than the chemicals you purchase from the shops.
- To remove all the fungi, moss and mildew, you can also try to use chlorine bleach. Plants and shrubs are susceptible to this chemical, so make sure you have diluted it properly before you start spraying on the roofs.
- Alternatively, you can opt for a method that is environmentally friendly method, where you make a solution from oxygen bleach and water on a ratio of 1:1. You can also opt for another cheaper option where you mix 3 1/2 cups of white distilled vinegar with 2 gallons of water. After you make these solutions, pour them into a sprayer, then spray on the part of the affected roof.
is advisable to use a backpack sprayer to allow your hands to be free to hold the ladder while getting up the roof. Your safety should be a priority. After deciding on the type or method you want to use to remove the moss from the roof, it's advisable to try some on a small test area to see the effectiveness.
Methods
How will you remove moss from your roof? These will largely depend on the roofing type, how dirty it is and the methods you choose to remove the moss. You can opt to use either cleaning products or physically without. After de-mossing the roof, make sure to treat it with an algae and moss resistant product.
Using a cleaning agent
Before using the cleaning agent, you need to clean the roof well; you need to use the high-pressure cleaner. After cleaning, you take the moss killer and spray it on the roof. The processing can take several hours depending on the persistence of the moss and other dirt. After the cleaning agent has been absorbed, you spray-clean the roof once again. When spraying, you need to wear protective clothing to prevent the chemicals from reaching your eyes or skin.
This method is highly recommended for old roofs with tiles that are handmade and slates because they have slight irregularities that make them difficult to clean. If you need to get the best results after cleaning your roof, it is recommended that you hire an experienced roof cleaner.
No cleaning agent
Instead of using a cleaning agent, you can use a high-pressure washer. You can also opt to use a V-ray at a pressure of 80 bar. You should spray in a downward direction to avoid getting water under the tiles.
DIY
Many people want to de-moss their roofs by themselves. It is a good idea, but you must be well conversant with the anti-moss products. You should choose the one that is suitable for your roof. You must read the instructions and guidelines carefully and ensure that you understand them, then you can test the product you have brought on a small part of the roof and watch how it works and other effects.
If you are working on it yourself, you need to consider how to access the roof. You can opt to use a ladder or hire scaffolding, which comes with an extra cost you need to consider, as well as additional safety concerns.
Setups needed to clean moss from roofing
Items you will require:
- Backpack sprayer
- A long scrubbing brush
- Protective clothing including footwear for your feet and a hat
- Rubber gloves
- Safety rope
- A long soft bristle brush
- A ladder
- The appropriate cleaning product chosen
Below are steps you will need to follow to ensure you clean moss from the roof effectively and efficiently.
- Ensure you dress appropriately for the job to prevent yourself from getting dirty and protect yourself from the harmful chemical. Your clothing should include safety glasses, old clothes, rubber gloves and non-slip footwear. You can use safety ropes in case you are going up the ladder. These chemicals might have adverse effects on vegetation, making you cover the nearby plants and flower beds with plastic sheeting.
- Ensure you position your ladder well to prevent any slipping and falling.
- Pick the garden hose and gently get up the roof using the ladder. Spray the moss on the roof with water from the hose. To ensure the effectiveness of your job, you need to work from top to down because this water will run down the roof just like normal rainwater.
- Then get your soft bristle brush, start brushing away the moss from the roof. It is advisable to work part by part and work on this part until it is straightforward, as this will conserve your energy and get you better control of the brush.
- Once the area is clean, you should now spray the anti-moss solution; it can be the one you bought from the shops or homemade. You can use a backpack sprayer or a large sprayer bottle. For a homemade solution, you should let it soak for roughly 20 minutes before rinsing it.
- After which, you pick the hose and get to the roof using the ladder. Spray from the top to remove and rinse off the moss killing chemical and remove the dead moss. Then take the soft little brush and scrub off any of the moss that has remained on the roof. Again you rinse the roof from any moss that was still sitting on the roof.
- Instead of using a garden hose you can use a power washer. Before using this approach, you must ensure you inspect and find out if the roof tiles are broken or missing because if you aim the high-pressure water to a broken or missing tile, you will do more harm to the roof. After checking for any broken and missing tiles and ensuring they are not there, you can now use the power wash while standing at the top, pointing downwards. Remember to set the machine at a lower pressure to avoid causing further damage to the tiles.
Ongoing treatment for long-term protection
It is the dream of any house owner to slow down the re-appearance of moss on their roofs. To achieve this, after the cleaning process, you should treat the roof with a moss-resistant product. This product will restrict the severe growth of moss but doesn't exclude new moss formation completely. The period in which you can keep your roof free from moss and algae will depend on the quality of the product you used.
Furthermore, roofing can be treated with special anti-moss coatings. To apply the coating, you should first cover the roof with a primer and give it time to dry, up to few hours. After the primer dries, you can now apply the actual coating onto the roof. This coating will make it hard for the mosses to stick to the tiles by providing a smooth moisture-proof layer.
Other methods to prevent moss from returning
After treatment, you need to come up with a measure that will help you prevent these mosses from going back into your roof. Mosses can’t grow on a roof where there is direct sunlight; so you can try to allow more sunlight to your roof as a preventive measure. You can achieve this by trimming the trees and branches around your house that prevent sunlight from reaching your roof. Also, it is good practice to help keep your gutters clean. You can achieve this by removing any leaves, twigs or mud stuck in your guttering, as this moisture will attract moss.
Longer-term solutions
After ridding your roof of moss, you can fix copper or zinc wires across the ridge tiles. This process is done because when it rains, the water will hit these wires releasing particles that will running down the roof tiles, thus preventing any further moss regrowth. Remember, the sulphate produced after rain falls on these materials flows through the roof, halting more moss growth. However, this method has various disadvantages.
Disadvantages of this method include;
- You may end up with some roof parts corroded, like the screws and gutters, because copper can cause corrosion to aluminium and galvanized parts.
- You can still get streaks of moss growth even after applying this method. Because you can't control the flow of sulphate, thus the streaks of moss will regrow where the sulphates effect was not felt.
- You can't use this method for large roofs because the action of the sulphate can’t extend beyond three metres from the ridge.
- The sulphate produced doesn't kill moss; instead, it only prevents growth, this moss that had already grown remains on the roof unless you take another method to remove them.
- It is generally a costly method, keeping in mind the cost of purchasing copper used in this method is high.
- This method only yields better results when used on flat-tiled roofs.
How long does moss take to regrow?
The time moss takes to re-appear will depend on the method you used to remove them. If you used a method that didn't involve any cleaning agent, the moss is likely to re-grow after 6-12 months. When chemicals are used, it may take years for the moss to re-appear.
Factors affecting the rate of regrowth of the moss
- The neighboring rooftops. If the roof neighboring yours is moss covered, it can migrate to yours immediately after cleaning.
- The shade. Whether it receives direct sunlight or is shaded by other obstacles.
- Maintenance. If you comply with measures like regular cleaning to prevent or minimise these recurrences.
- The effectiveness of the chemical to kill the moss spores after the roof cleaning.
- The skillfulness of the roof cleaners you hired to perform the task.